|
|||
|---|---|---|---|
| # of Zones | 1 | ||
| Occupants | |||
| Undead Enemies (1 boss-level Undead) |
|||
| Important Treasure | |||
| 1 boss-level Chest | |||
| Console Location Code(s) | |||
| FortVirtueExterior, FortVirtue | |||
| Region | |||
| Heartlands | |||
| Location | |||
| Southwest of the Imperial City, near the intersection of the Red Ring Road and the Gold Road | |||
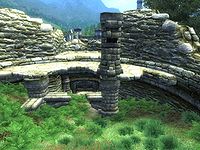
Fort Virtue is a small fort southwest of the Imperial City containing undead. It contains only one zone, Fort Virtue.
NotesEdit
- Fort Virtue appears in ESO as Virtue Outlook.
BugsEdit
- The levers that open the gates at E and F will each work only once, meaning that part of the fort is only accessible the first time you explore it. If you return and try to use the levers, you will trigger the message "The lever is stuck and will not budge." To exit the fort on subsequent visits, you must backtrack from the lever.
ExteriorEdit
- The exterior is located at coordinates: Tamriel -2, 10
- This location's map marker (M on map) is named Fort Virtue (editor name FortVirtueMapMarker). The entrance door is NNE of the marker, 110 feet away.
- 1 Imperial Legion Soldier is near the entrance
- 2-3 Mud Crabs are near the entrance
- 1 Wilderness Creature (Plains variety) is near the entrance
- 1 Nirnroot is at location N on map
- The following plants can be found near the entrance: 4 Fly Amanita plants, 6 Monkshood plants, 6 Sacred Lotus plants, 1 Summer Bolete plant, and 9 Water Hyacinth plants
- The other following items can be found near the entrance: 1 Shadow Shape scroll (on top of the tallest pillar)
- 1 Wayshrine of Dibella is at W
Zone 1: Fort VirtueEdit
The gate at E forces you to proceed through the fort in a counterclockwise direction. On your first visit, after reaching the boss chest (B), you will be able to open the gates at F and E using the adjacent levers (cyan dots on map) and quickly exit the fort. On subsequent trips, however, you will be forced to go back around the long way, as the gates will not open.
Other than the enemies (including the boss-level undead), boss chest, and seven minor loot chests, the zone features two pairs of Darts traps (D) and a set of three Swinging Mace traps on a bridge (C). The Darts traps may be avoided entirely, as the far side only features two coffins containing clutter. The Swinging Mace traps are activated as you walk under them; if you run quickly enough, you may avoid them.
Occupants:
- 1 boss-level Undead at location A on map
- 1 Undead (always best possible level)
- 6 Undead Enemies (each 83% probability Undead, 17% Rat)
Treasure:
- 1 boss-level Chest (Undead variety; locked) at location B on map
- 1 Chest 01
- 2 Chests 02
- 2 Chests 04
- 2 Coffins 02
Traps:
- 4 Darts traps at location D on map
- 3 Swinging Mace traps at C
Doors and Gates:
