This article is about the place. For the quest, see Bleak Falls Barrow (quest).
|
|||
|---|---|---|---|
| # of Zones | 2 | ||
| Clearable | Yes | ||
| Dungeon | Yes | ||
| Respawn Time | 10 days or 30 days | ||
| Level | Range: 6-20 | ||
| Occupants | |||
| Bandits, Draugr, Skeevers, Wounded Frostbite Spider | |||
| Important Treasure | |||
| Dragonstone Golden Claw Thief |
|||
| Console Location Code(s) | |||
| BleakFallsBarrowExterior, BleakFallsBarrowExterior02, BleakFallsBarrowExterior03, BleakFallsBarrowExterior04, BleakFallsBarrow01, BleakFallsBarrow02 | |||
| Region | |||
| Falkreath Hold | |||
| Location | |||
| West of Riverwood South of Secunda's Kiss |
|||
| Special Features | |||
| Word Wall | Unrelenting Force | ||
| Ore Veins | |||
| # of Iron | 2 | ||

Bleak Falls Barrow is a medium-sized Nordic ruin west of Riverwood containing bandits, draugr, and skeevers. It contains two zones: Bleak Falls Temple and Bleak Falls Sanctum.
Its word wall teaches part of the Unrelenting Force dragon shout.
Related QuestsEdit
- Bleak Falls Barrow: Retrieve the Dragonstone.
- The Golden Claw: A shopkeeper wants you to retrieve his family heirloom from a bandit.
WalkthroughEdit
ExteriorEdit
An unmarked location called "Bleak Falls Tower" can be found along the path to the barrow from Riverwood. It is home to three leveled bandits who will attack if you approach too closely, and contains a medium coin purse inside on the lower level and a chest on the top level. As you near the barrow itself, the three bandits guarding the exterior will attack. An adept-locked strongbox and an apothecary's satchel can be found in a corner of the temple wall; to find them, turn left when facing the entrance, then follow the wall around and turn right twice around the western edge of the temple exterior.
Bleak Falls TempleEdit

You may first hear of the barrow from Ralof or Hadvar, if you choose to accompany one of them to Riverwood after escaping from Helgen. Arvel the Swift goes into hiding here after stealing the golden claw from the Riverwood Trader.
When you first enter the dungeon, you will find several dead skeevers, two dead bandits, and two living bandits idling by a campfire at the far end of the hall near a novice-locked chest. After dispatching the bandits, continue down the tunnel to the west. Where the tunnel turns to the south, you will pass three burial urns on two altars to your right. The tunnel then turns west, passes a short set of stairs quickly ending in a cave-in to the left, then turns north and west again. You will pass a set of shelves to the left holding a potion, with a burial urn nearby on the floor. The tunnel will soon turn north and lead into a room with three pillars on the left and a locked gate in front of you. Depending on how quickly you arrived, you may see a bandit entering the room just ahead of you. Provided he doesn't see you, he will attempt to open the gate, triggering the dart trap. Typically, this will cause him to die, but it's possible for him to survive or get distracted from opening the gate, in which case you will have to fight him. Alternatively, he may already be dead by the time you find him.
Once the bandit has been dealt with, you can explore the lever room. Up the stairs on the right, you will find a potion on a shelf. To open the gate, you have to set the pillars in the proper sequence. If you get the sequence wrong, the gate will remain closed and a series of poison darts will shoot in the direction of the lever. The correct sequence can be deduced by looking at the three statues in the room, two of which are found above the gate. The third (which is in fact the middle statue) has fallen to the floor next to the lever. The pillars should be set to display the same symbols as the statues. Starting with the pillar farthest from the gate, the correct sequence is: Snake—Snake—Whale.
On the table in front of you as you enter the next room is a potion and a copy of the Pickpocket skill book Thief. To the left of that table, there are two burial urns, a soul gem in a stand, and a chest. Descending the wooden spiral staircase to the left leads to another lit room where three skeevers will emerge from the eastern passage ahead and attack. You should have no trouble with them, even at very low levels, but you may contract Ataxia if you are unlucky. A scroll of fireball and a paralysis poison are on the table here.
Press on, and you will soon hear Arvel calling out to you for help, as he assumes you are one of his bandit partners (Bjorn, Harknir, and Soling). Before rushing to help him, note the thick webs near a lootable skeleton at the end of the hallway, which conceal a chest. More webs block your path to Arvel to the north; cut your way through them and enter the chamber, and a special giant wounded frostbite spider will drop down and engage you in combat. If you have problems defeating it, you can retreat back through the archway to recover, since the spider is too large to leave the room. Once you kill it, loot it for its venom, and find several other grisly items to search in the room, including four dessicated corpses, three web sacs containing skeever tails, and three egg sacs. Proceed to cut down Arvel, who will ungratefully rush off further into the dungeon. However, if you are quick enough, you can optionally kill Arvel before he escapes.
Chasing after Arvel to the west, you will pass through an embalming room with a complete set of embalming tools, three urns, four burial urns, and a soul gem, then enter catacombs with corpses lining the walls. You can loot any corpses that aren't skeletal. As you reach the bottom of the ramp, however, you'll see one of the corpses (known as draugr) rise from the dead and prepare to attack you, and may see or hear others doing the same. Note that only draugr in armor (male) or tattered clothes (female) will reanimate; corpses still in wraps or naked are "permanently dead". Thus, if you're careful and observant, you'll be able to tell whether a draugr is going to attack you before they wake up.
After the battle, you will find Arvel's corpse on the ground. If he avoided being killed by a draugr, then he will die after activating a pressure plate on the ground, triggering the spike wall trap on your right. Search his corpse to recover the golden claw and read his journal, which will provide a crucial clue for an obstacle you will encounter later on. Step around the plate or behind the gate, and continue down the hallway to the north. Your quest journal now tells you to find the secret of Bleak Falls Barrow.
Straight ahead is another sleeping draugr, and after him to the east is a room where three more draugr will reanimate and come for you. Although they're fairly weak, they can be dangerous if you're lightly armored and get surrounded. If you're careful, you can wake them one at a time and deal with them individually. A short collapsed staircase on the eastern side of the room to the right leads to an apprentice-locked chest. On the left is a swinging blades trap, which you can't do anything about from this side. Timing a sprint through the trap will leave you unscathed. You can then pull the chain on your left to deactivate the trap, allowing you to hear better and escape into the previous areas if needed. Proceed through the winding passages, dealing with the "resting" draugr as you go. At one point, you may notice a prismatic sheen on the floor; this is an oil slick trap.
The tunnel will eventually open to the east into a large, well-lit cavern with a waterfall. As you enter, a draugr will burst out of a sarcophagus in the opposite corner, but you can easily take it out with ranged attacks before it reaches you. The way ahead is blocked, so after looting the chest to the right of the sarcophagus, head to the gate the stream drains through, then pull the chain beside it to raise the gate and continue to the south downstream. Where the cave turns to the east, you will find a lootable skeleton, two pickaxes, and an iron ore vein on the ground. The stream then drops off into a large cavern open to the sky. If you stand at the edge of the waterfall and look down, you will see either a leveled draugr or, at player level 18 or higher, a frost troll, and above you and to your right a rope hanging from a log that spans the open top of the cavern. A ledge below the end of the rope holds the body of Thomas, a Breton who evidently died trying to climb down the rope into the cavern. From here, you can either shoot the enemy below, or turn right and take the passageway down to meet it head on. There is a chest at the top of this passageway, just to the right of the opening. Follow the winding passage all the way to the bottom of the waterfall to find a novice-locked chest, two lootable skeletons, and one dead skeever, then return partway up the earthen ramp and head north to follow the path to the end of this zone. After the passage turns briefly to the west then back to north, loot a potion from inside a stone bowl to the right. Ascend to the final room of the area, where only one more draugr stands between you and the exit. This draugr is a little stronger than most of the others, but shouldn't pose a serious problem. Loot the apprentice-locked chest in the rubble to the right of the exit, then head through the doors to Bleak Falls Sanctum.
Bleak Falls SanctumEdit

Inside the sanctum, after proceeding from the first room down a corridor to the west then south, you will encounter another swinging blades trap. The chain to deactivate the trap is in the next room, around the right corner just past the blades. Three draugr are in this chamber: one will climb out of a coffin close to the entrance, while the other two are on the upper level much farther back. An oil slick is on the ground around a floor grate in the middle of the room. To the right of the entrance to the room is a smaller room containing a potion. Go up the wooden stairs and around the upper level to cross a stone bridge to the west leading to a large iron door. The door opens to a long passageway blocked by a puzzle door.
The locking mechanism is controlled by three concentric circles: each is marked with animal symbols, and can be rotated. As hinted in Arvel's journal, the correct combination is marked on the palm of the golden claw. From the outer to the inner circles, the correct sequence Bear—Moth—Owl. After the circles are properly arranged, activate the keyhole to open the door. (The default angle of the claw when examined in your inventory makes the symbols almost impossible to read. Placing the cursor over the claw and pressing your "Auto Move" button zooms in and allows you to rotate the claw, making it possible to see the symbols clearly.)
At the top of the stairs past the puzzle door is a large, well-lit cavern, with an iron ore vein on the wall to the left near the entrance. Proceed through the cavern and across the bridge. Before walking up the steps to the dais, head behind the runed wall on the right-hand side to find a chest on the rocky ledge behind the waterfall. There's another chest with a potion on the ground nearby hidden behind the waterfall on the other side of the cavern as well. Ascend to the dais and loot the chest next to the sarcophagus, as well as the poison and soul gem on the small shelving unit nearby, then walk into the arc of the wall.

As you approach the wall, you will hear chanting, the screen will rapidly darken, and part of the wall will start to glow, with threads of energy rushing from it to you; don't worry, they're harmless. Once you are close enough, you will automatically "read" the glowing rune, which is the first word of the Unrelenting Force shout. You won't be able to do anything with it yet. However, the surge of magic will cause a draugr "boss" to burst from the sarcophagus and attack.
This enemy is much stronger than the draugr you faced previously. Your best strategy is to dish out as much damage as you can as quickly as you can (use fire spells if you're a mage), drink healing potions sooner rather than later, and if things get desperate (or if you prefer to use ranged attacks), sprint past the boss to buy some breathing room. There are a few locations in the cavern where you can maneuver yourself into a safe place to snipe at the enemy if need be; across the river in the southern corner works well. Once your foe is dead, loot its corpse for the Dragonstone.
Following the western passage to the top, you will reach what appears to be a dead end. There is a pedestal nearby with a handle on it. Activate the handle to lower the rock wall in front of you, revealing a passage to yet another chest, a pedestal with a human skull and flower offerings (two blue mountain flowers, two red mountain flowers, and two purple mountain flowers), and an exit to the opposite side of the mountain from where you entered the barrow. Outside, a potion is on the ground around the corner to the left. Two corundum ore veins are also near the exit: one nearby south-southeast of the exit, and the other about 200 feet to the southwest.
NotesEdit

- The inscription on the word wall is as follows:
-
HET NOK F1L V4LOK
D2NM1R DO DOV4GOLZ
4RK 1N FUS DO UNSL1D
R4GOL 4RK VULOMThis translates to:
Here lies The Guardian
keeper of the Dragonstone
and a force of eternal
rage and darkness
- The word you have just learned is "FUS".
- The rope and the body of Thomas will not be present in Bleak Falls Temple if you are level 17 or below, as his presence is related to the frost troll in that cavern.
- Enemies in this location will remain at the levels determined when you first enter, but this is one of a few locations with a level cap (at 20). Therefore, the final boss may be a different level than the other enemies.
- This is an excellent location to harvest the alchemical ingredient skeever tails, with seventeen guaranteed samples in total.
BugsEdit
 On certain saves, the three pillars that need to be turned to display the correct sequence sometimes do not turn, therefore preventing you from proceeding and halting progress on the related quests Bleak Falls Barrow and The Golden Claw.
- If you cast a Fury spell on the wounded frostbite spider, it may attack Arvel, releasing him from the web. He will join you in fighting the spider, then stand there begging you to cut him down. Spells and weapons will pass through him. Destroying the webs will allow you to proceed as normal.
- If the dragon claw door does not work, check here for possible fixes.
- You may be unable to loot the Dragonstone's guardian once defeated, thus making it impossible to complete the related quest. If this happens, first try leaving the area and re-entering. If that doesn't work, deliver the golden claw to Lucan Valerius in Riverwood, then return to Bleak Falls Barrow, and the guardian should be lootable.
- If you return to the barrow later and sneak by the two bandits who discussed Arvel and the claw, they may discuss it again, even though Arvel is dead and the claw is now back where it belongs. ?
- If you return to the barrow later and approach the bandit who activated the poison dart trap, he may not activate it again, forcing you to kill him yourself. ?
- If you return to the barrow later and approach the word wall, you may again hear the chanting sound, even though you've already learned the word from the wall.
MapsEdit
-
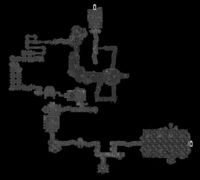
Bleak Falls Temple
-
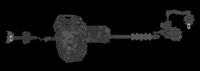
Bleak Falls Sanctum

